

Hanging pictures with cubicle picture hangers

Cubicle partitions come in many shapes and sizes. Hanging pictures on fabric is no problem, you could use push pins or Velcro. But what if your wall is solid? And you still want to jazz it up or give your cubicle a makeover?
Don’t worry, that’s where cubicle partition hangers come in. Basically, they are picture hangers for cubicle walls. Decorating with these hangers is no rocket science, just follow the steps below:


Step 1: start afresh
A cubicle makeover can only succeed if you literally start with a clean slate. So, take out all the clutter you’ve accumulated over time and clear your cubicle walls. It will feel good, we promise.
In the process, don’t forget to remove tape residue from your walls, because fresh is fresh. And you won’t need any more tape from now on!
Step 2: what is your wall type?
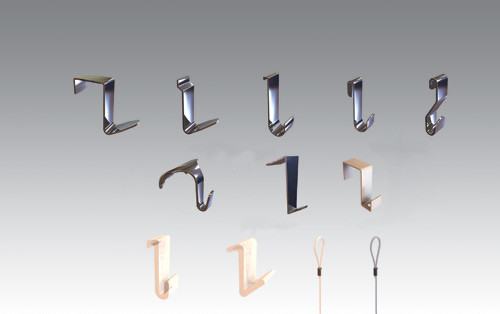
The second step is to determine the depth, height and material of your partition. The depth will lead you to your choice of cubicle partition hangers. Knowing the height of your cubicle will come in handy when we try to determine the line of sight at which to hang your frames. The material, finally, will be a leading condition when you decide on the weight and type of frames you will hang.
Step 3: establish your line of sight
In a way, this is the most important step to creating a coherent look in your cubicle. But don’t stress out if you don’t get it quite right the first time around. The beauty of cubicle partition hooks and matching cords, is that your frames can be moved and adjusted easily in height and width, without damage to the partitions.
a) Stand in the entryway of your cubicle and look in. Which wall is the largest blank canvas? Is it the wall facing you, or one of the walls to your side? Decide how much room you have and how many frames you would like to display. Just one? Just one wall?
b) Frames are often hung too high. To steer clear of this trap, divide the height of your cubicle wall (the part that’s sticking out above your desk) in two. This will form the central line to line out your frames on.
c) If you wish to hang small frames, line the top of these frames out on your center line (so they will in effect hang just below the center). If you use larger frames, line the first third of the frame out on this line. Are you combining small and large frames, then choose either the top or center frame method, don’t combine the two.
d) Are you decorating primarily for yourself or for your visitors? For example, the direction you are facing while working at your computer or laptop might determine where and how high you hang your photos or artwork.
Step 4: choosing frames
Based on your observations and decisions in step 2 and 3, choose the number and dimensions of your picture frames.
As a general rule, large picture frames make small spaces look spacious. Sounds contradictory? Try and play with it. A number of small frames easily create a cluttered look, making a space feel cramped. So, don’t be afraid to hang one or two large frames, as long as the partition wall will support the weight.
Step 5: hang your picture frames!
Slide your cubicle picture hangers over the cubicle. From it, hang STAS perlon cord or STAS steel cable with loop. Your basic setup is now ready. The last step is to slide a STAS picture hook (zipper or smartspring) over your cords to the height you have calculated by means of the center line (step 4c). Then, simply hang your frames from the picture hooks.
Don’t like what you see after all? Take the frame(s) off the hook again, and easily adjust the height of the zipper or smartspring. Try again until you are fully satisfied.
Ready to give it a go? All STAS components can be bought easily in our online shop!