


How to hang pictures the right way
- How do I install a STAS rail?
- On which wall types can I install a STAS rail? Can I install the rail on a plaster wall?
- What is the best way to install the rail perfectly level?
- At what distance from the ceiling should I install the rail?
- Can I cut the rail to size?
- Can I paint the rail? If so, which type of paint and pretreatment are necessary?
- Can I mount the rail in or on a corner?
- Can the rail be hung diagonally?
- How many meters of rail do I need?
- How can I remove the rail again?
- Is the rail suitable for paintings only or could I also hang a whiteboard, clock or mirror?
- Which hooks and cords should I pick?
- Can I hang multiple pictures from one cord or cable?
- Can I cut the perlon cord or steel cable?
- How wide is the steel cable?
- How wide is the perlon cord?
- How long does a steel cable last?
- How long does a perlon cord last?
- What is the weight capacity of a zipper and a smartspring?
- The STAS smartspring is creating tiny cracks in the cord, how is that possible?
- How can I make sure the hooks are not visible above the painting?
- How do I prevent a painting from tilting forward when hung?
- I want to move the STAS cobra to another place in the rail. Can I just pull the cord to the left or right?
- For questions about STAS multirail click here
- For questions about payments, shipping and delivery click here
- To view the manuals / installation instructions, click here
- To view our installation tips on YouTube, click here
| YouTube video (click on the image) | |
|---|---|
| How to install the STAS picture hanging system? | 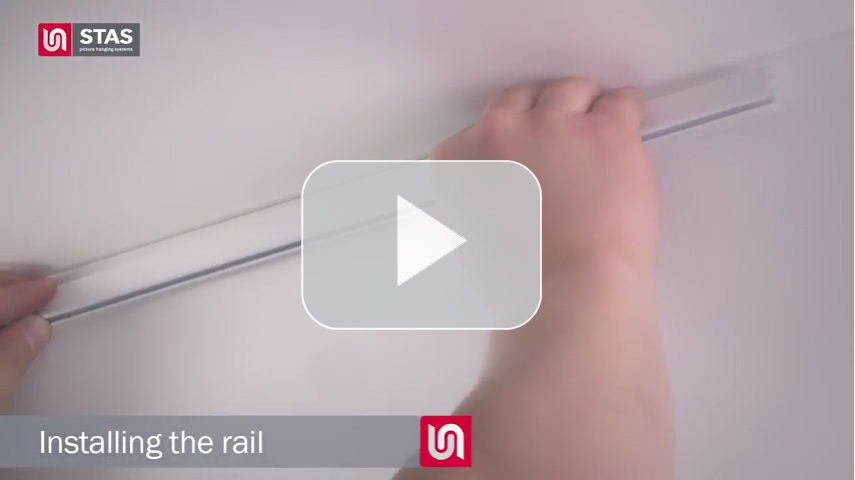
|
| How to use the STAS drilling template? | 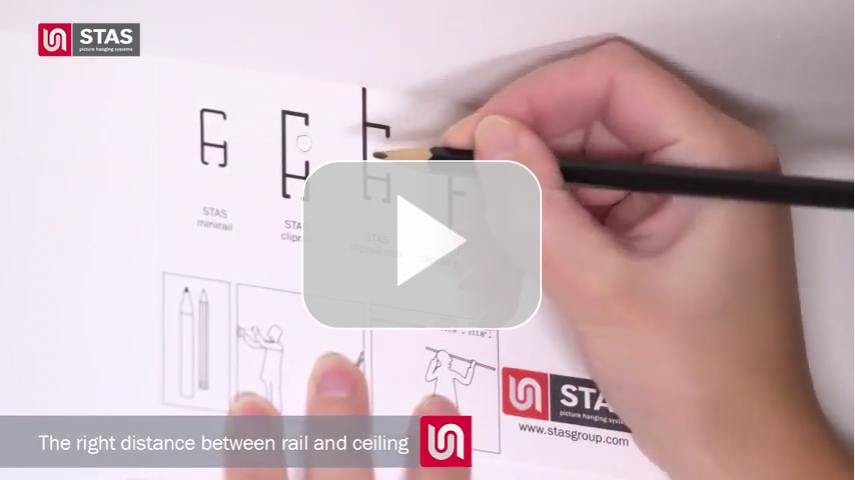
|
| How to shorten a STAS rail? | 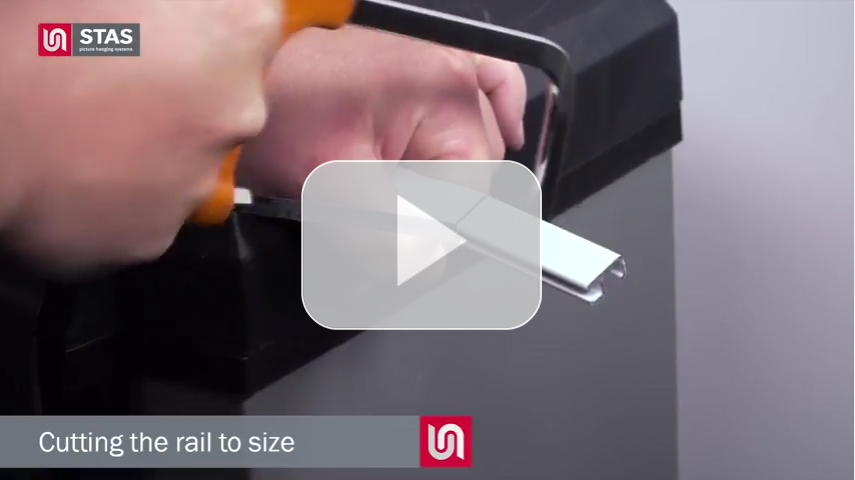
|
| How to connect STAS rails in a corner? | 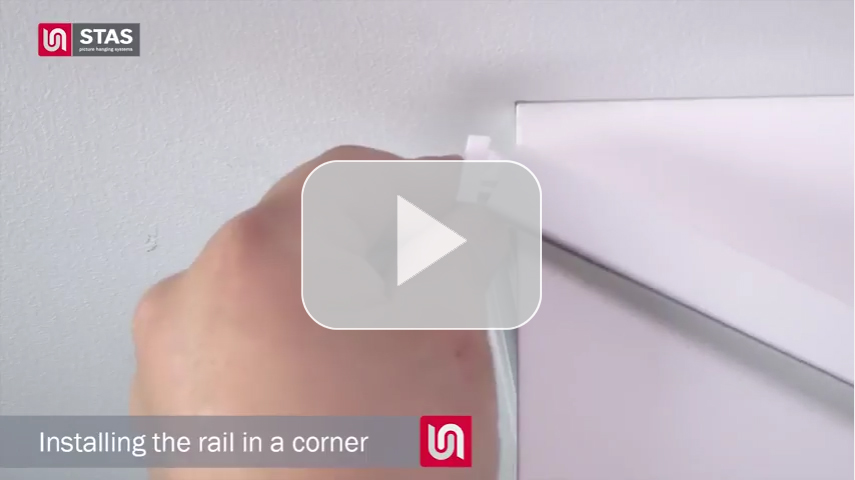
|
| How to remove the STAS picture hanging system? | 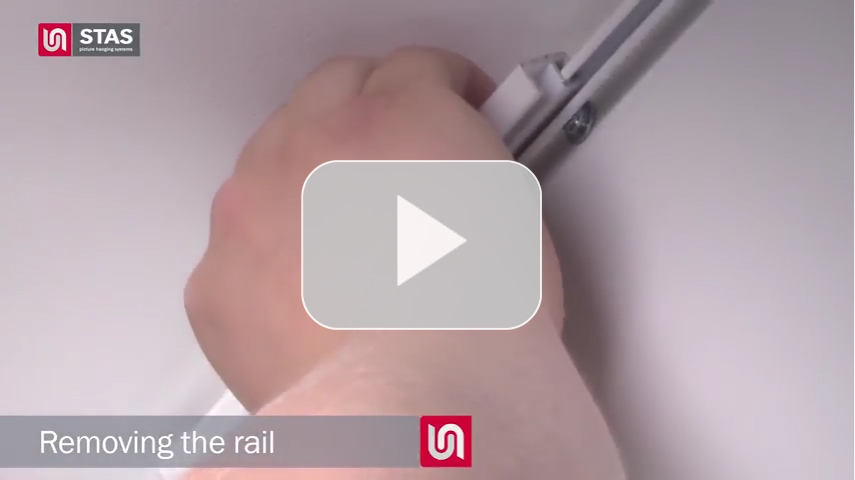
|
How to hang pictures? STAS has the answer!

How do I install a STAS rail?
Installation videos can be found on the product pages for the different rail types. Or view all installation instructions here.
On which wall types can I install a STAS rail? Can I install the rail on a plaster wall?
STAS rails can be installed on almost all wall types.
On concrete and brick walls, the rail can be installed with the provided plugs.
On timber walls, the rail can be installed just with the screws.
On plaster walls, the rail can be installed with special plugs for plaster walls.
Installation on glass is not possible.
What is the best way to install the rail perfectly level?
Mark the wall on both ends with a small dot about one inch from the ceiling. We recommend using a chalk line between these two dots (requires 2 persons). If your wall and ceiling are completely smooth, flat and level, it is also possible to use a wooden strip of about two inches wide. Simply hold it to the ceiling and mark a short line underneath along the wall at every 10 to 16 inches. The brass clips / clip screws and fasteners can now be installed on this line. When the rail is mounted, the pencil marks will no longer be visible.
Note: when installing STAS j-rail, STAS j-rail max, STAS multirail crown or STAS multirail flat, it is also necessary to mark the drilling spots on the chalk line, since the holes have been pre-punched into the rail.
At what distance from the ceiling should I install the rail?
For ceilings that are completely smooth and even, we recommend drilling at 0.75 – 1 inch below the ceiling. For textured (popcorn) ceilings or uneven ceilings, we recommend drilling at about 2 inches below the ceiling. Also keep in mind that the drill leaves marks on the ceiling if you are drilling too close to it (this is a common mistake).
You can download a handy drilling template here to help you install your picture hanging system at the correct height.
Can I cut the rail to size?
Yes, the rail can be easily cut to size using a hacksaw. Remove any burrs after sawing (to avoid scratching the rail lacquer).
Caution: when sawing one of the STAS multirail systems, it is vital you use the included wooden strip to keep the copper wires in place.
Can I paint the rail? If so: which type of paint do I need and which pretreatment is necessary?
Yes, the rail is paintable. Gently sand down the rail with very fine sandpaper and make sure the rail is clean, dust free and greaseproof. Next, paint the rail with acrylic paint.
Can I mount the rail in or on a corner?
Yes, two rail segments can be connected in or on a corner with the help of corner connectors (aka combicaps). These are available in our webshop.
Can the rail be installed diagonally?
No, the rail must always be installed horizontally.
How many metres of rail do I need?
For optimal flexibility and the sleekest look, we recommend installing rail across the full length of your walls. The rail can be easily cut to size.
How can I remove the rail again?
The best way to remove the rail from its clips, is to use a screwdriver. Wrap a piece of cloth around the screwdriver to prevent damage to the rail. Place the screwdriver at the bottom of one end of the rail, between the rail and the wall. Now carefully move the screwdriver upwards, pulling the rail loose from its installation clips. Once you have made a start, you can gently loosen the rail by hand.
Is the rail suitable for paintings only or could I also hang a whiteboard, clock or mirror?
Our hanging systems will accommodate many diverse objects like whiteboards, clocks, mirrors, quilts, seasonal decoration and any other object that is flat enough, has proper hanging hardware and doesn’t exceed the maximum load capacity. So feel free to get creative!
Which hooks and cords should I pick?
This depends on the type of rail you have chosen, the weight you wish to hang from the rail and the look you prefer. How to hang pictures with cords and hooks, there are many options.
The perlon cord is transparent and therefore hardly visible. The steel cable (also available in black and white) is suitable for hanging heavier decorations and has a more industrial look.
Several combinations can be made per rail type. Rails in the STAS j-rail series use different hooks and cords.
STAS minirail, STAS cliprail, STAS cliprail max, STAS cliprail pro, STAS decor rail, STAS u-rail, STAS multirail:
Weights up to 8.8 lbs / 4 kg: STAS smartspring on STAS perlon cord with cobra tip
Weights up to 22 lbs / 10 kg: STAS zipper on STAS black / white steel cable with cobra tip
Weights up to 33 lbs / 15 kg: STAS zipper on STAS perlon cord with cobra tip
Weights up to 44 lbs / 20 kg: STAS zipper on STAS steel cable with cobra tip
STAS j-rail:
Weights up to 8.8 lbs / 4 kg: perlon cord with disk + cylinder hook + STAS smartspring
Weights up to 8.8. lbs / 4 kg: S-hook + perlon cord with loop + STAS smartspring
Weights up to 33 lbs / 15 kg: perlon cord with disk + cylinder hook + STAS zipper
Weights up to 33 lbs / 15 kg: STAS j-rail rod + spring hook
Weights up to 33 lbs / 15 kg: S-hook + perlon cord with loop + STAS zipper
Weights up to 44 lbs / 20 kg: S-hook + steel cable with loop + STAS zipper
STAS j-rail max:
Weights up to 88 lbs / 40 kg: STAS j-rail max rod 4x4 + STAS j-rail max hook for 4x4 rod
Weights up to 88 lbs / 40 kg: STAS j-rail max security rod 4x4 + STAS j-rail max security hook + optional theft-delaying STAS j-rail max security cap
Weights up to 220 lbs / 100 kg: STAS j-rail max rod 4x10 + STAS j-rail max hook for 4x10 rod
Can I hang multiple pictures from one cord or cable?
Yes, you can. You can use multiple STAS smartsprings or STAS zippers on a single cord or cable. Just make sure the maximum allowed weight of the cord is not exceeded. Also keep the maximum weight capacity of the selected rail system in mind.
Can I cut the perlon cord or steel cable?
Basically, the perlon cord can be cut. However, this may cause problems: the use of unsuitable scissors may create a burr, making it difficult to slide the picture hook onto the cord. We recommend rolling up the overflowing piece of cord and tucking it away behind your artwork (if necessary, use an elastic band, some tape or a paperclip). Steel cable cannot be shortened.
How wide is the steel cable?
The steel cable is 1.8 mm wide.
How wide is the perlon cord?
The perlon cord is 2 mm wide.
How long does a steel cable last?
The steel cables have a limitless life span.
How long does a perlon cord last?
We recommend replacing a perlon cord every five years due to exposure to climatological influences.
What is the weight capacity of a zipper and a smartspring?
A smartspring on perlon cord can carry up to 4 kg.
A zipper on perlon cord can carry up to 15 kg.
A zipper on steel cable can carry up to 20 kg.
Combining a smartspring with a steel cable is not possible.
The STAS smartspring is creating tiny cracks in the cord, how is that possible?
This is caused by the self-locking mechanism of the smartspring. The hook latches onto the perlon cord for grip. These surface cracks do not influence the quality or the load capacity of the cord.
How can I make sure the hooks are not visible above the painting?
This differs per type of painting, depending on where the hanging hardware is situated at the back. Is your painting hung from steel wire hardware? If so, make sure the steel wire isn’t too long. The painting will also tilt forward if this is the case.
The use of a sawtooth hanger can be a very good solution in all cases.
How do I prevent a painting from tilting forward when hung?
If your painting is tilting forward, you may want to check the hardware at the back of it. Chances are the wire is too long or attached too low.I want to move the STAS cobra to another place in the rail. Can I just pull the cord to the left or right?
No, we emphasize that the STAS cobra is specifically designed to hook into the rail at any desired location. If the cord is pulled too hard under a certain angle, there is a chance that the STAS cobra will be bent. This is due to incorrect use of the system and STAS is in that case not responsible for consequential damage.
My picture lighting is not working. What can I do?
Non-working picture lighting can have several causes. We will explain the most common causes and solutions. Always disconnect the power before making any adjustments to the picture rail.
1. Check the rail conductor
The rail conductor must disappear completely into the rail in order to make a good connection. Isn't this the case? Remove the rail conductor, place it diagonally in the rail, turn the conductor straight again and push it straight up until it completely disappears in the rail.
2. Check the voltage conduction
The piece of wood that comes with the STAS multirail ensures that the voltage conductor stays in place when you want to shorten the rail. After mounting, check whether the copper voltage conductor is still secured in the plastic housing.
3. Check the fixtures
For correct mounting, first place the fixture at an angle in the rail and then straight up. Don't forget to tighten all the Allen screws of the fixture. Insufficiently tightened Allen screws can cause a defective lamp or a short circuit.
4. Check the wattage of the lamp in combination with the power of the adapter
Before mounting the lamp on the fixture, check whether the wattage of the lamp (and the number of lamps) is compatible with the power of the adapter. Too high a wattage or too many lamps can overload the adapter. Please note the following:
Did you check everything? Turn the power back on. The picture rail is not properly connected until both the lamp and the control lamp of the adapter light up.
Fix connection problems with the STAS Wi-Fi smart-led
Have a look at our detailed manual or watch the installation video to connect the smart lighting to your smartphone/iPad and the STAS multirail.
Please take this into account during installation:
- The STAS Wi-Fi smart-led only works on 2.4Ghz, not on 5.8Ghz. Check if your router is compatible with both frequencies.
- Do you use Wi-fi amplifiers? Check whether the app and the STAS Wi-Fi smart-led are installed on the same network.
- It is very important to place the fixtures, in combination with the STAS Wi-Fi smart LED, one by one in the STAS multirail and to install them by means of the app.
Solve error I18N@requirementMissing
This error can arise when all lamps are installed in the app and you want to create groups.
Solution: Uninstall and reinstall the app. Then log into your existing account with your email address (enter this at “account number”) and your password that you created earlier. The installed lamps are now automatically loaded into the app and you can create groups without any problems.
- Can I cut the rail to size?
- Is the system dimmable?
- Is there a battery-operated alternative?
- Can I install an on/off switch or dimmer on my system?
- Which fixtures should I choose?
- Can I shorten the fixtures?
- Which type of lamp is suitable for the fixtures?
- Can I use a halogen lamp?
- Can I use a led lamp with a different shape?
- Can I use a lamp with a different wattage?
- Should I use a transformer?
- How many transformers do I need?
- Can I use my own transformer?
- Can I use 2 transformers on 1 rail?
- How many light fixtures can be installed on one rail segment?
- Can the cable be extended (from the rail to the transformer / from the transformer to the power socket)?
- Could I use the system in the bathroom?
- Should I turn off the power before I place the fixtures?
- Should I turn off the power before I replace the lamps?
Can I cut the rail to size?
Yes, you can, provided that you use the wooden strip included with the rail. Slide the wooden strip in the rail at the spot where you will be sawing. That way, the copper wires in the rail will be kept in place while sawing and will not get damaged. After sawing, remove any burrs.
Is the system dimmable?
Unfortunately, the current STAS transformers are not dimmable.
Is there a battery-operated alternative?
No, currently there isn’t.
Can I install an on/off switch or a dimmer on my system?
We would strongly advise against this. When used incorrectly, the transformer can become very hot and can easily burn out. Moreover, you will lose all warranty rights when you connect your own switch or dimmer switch to the system. STAS urgently advises NOT to use a dimmer switch.
Which fixtures should I choose?
This is mostly a matter of taste. We provide 2 types of lighting fixtures. The ‘sirius’ fixture has a length of 50 cm. The ‘signo’ frame has an arched design and is 70 cm long. Both fixtures have a chrome finish. We recommend using the fixture of 70 cm on walls that are 8.8 ft (2.70 m) or higher.
Can I shorten the fixtures?
No. Like the multirail, the fixtures are specifically designed by STAS and are attuned to the rail and the other components. Fixtures are not supposed to be cut or bent.
Which type of lamp is suitable for the fixtures?
We provide a 4 W powerLED lamp for both the ‘sirius’ and the ‘signo’ fixtures. Led is extremely energy efficient and does not get warm or emit UV or infrared radiation. Moreover, led lights have a much longer lifespan than halogen. In short, led is without a doubt the safest, cheapest and most durable option for illuminating artwork.
STAS multirail powerLED 4 W (code: VL 10700)
Tone: cool warm white 3000 K.
Lifespan: 20.000 hours.
Output: equivalent to a regular 20 W bulb.
Closed shell (no translucency at the back).
Equipped with 3 leds and a frosted lens.
Can I use a halogen lamp?
No. The transformer is created specifically for led lights. Using halogen lamps could damage your system.
Can I use a led lamp with a different shape?
In essence, you can. Nevertheless, keep in mind that the two pins in the light fitting should fit into the fixture. We recommend exclusively using the STAS lamps. We offer MR11-GU4 lamps. The bigger MR16-GU5.3 lamps will damage the fixture.
Can I use a lamp with a different wattage?
Not without taking into account the wattage in relation to the transformer capacity. Moreover, a light beam with a different intensity could burn your artwork. We therefore strongly recommend exclusively using the STAS lamps.
Should I use a transformer?
Yes, STAS multirail can only be used when connected to a transformer. We provide a transformer of 45 W (max. loaded).
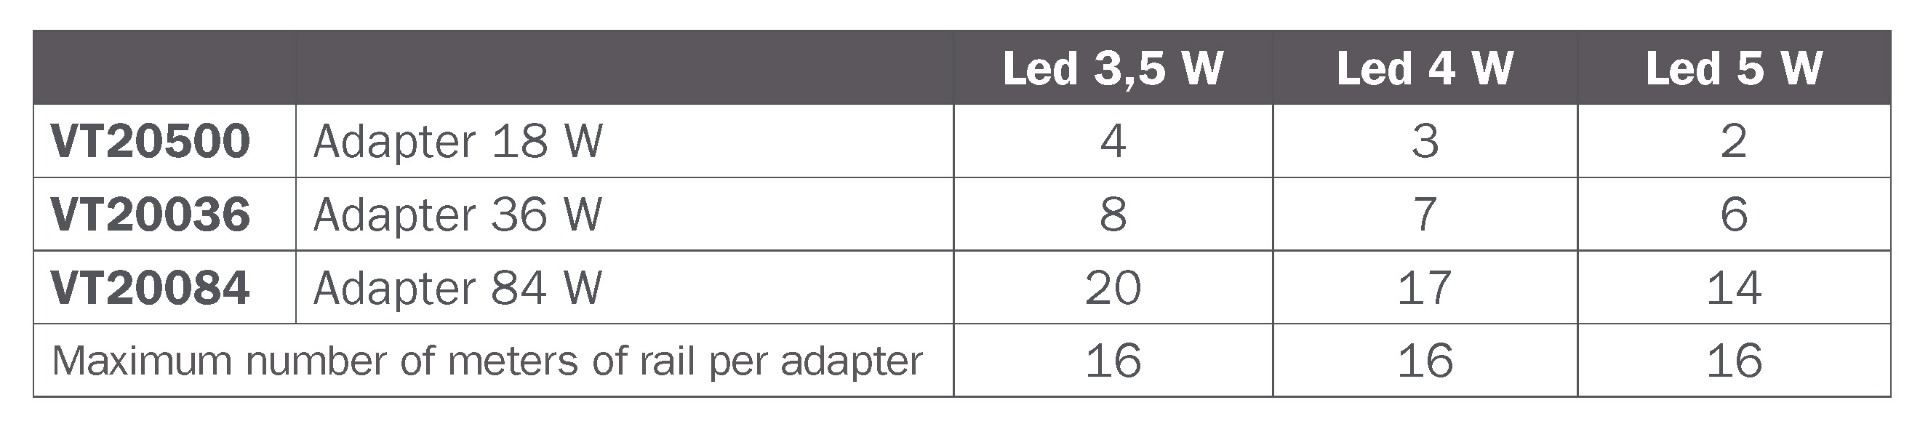
How many transformers do I need?
One transformer can supply power to a maximum of 52.5 ft (16 m) of rail. You can use 10 led lamps per transformer.
Be careful: if you wish to use more rail footage or more lamps, you will need an extra transformer, but you can NEVER connect two transformers! (see warning below)
 WARNING: when using more than one transformer, create independent circuits! In other words: two transformers should never be connected. Therefore, NEVER connect two rail segments that are each connected to a different transformer! Only connect rail segments that share one transformer.
Can I use my own transformer?
No, due to design- and safety regulations you can only use the STAS transformer that was specifically designed for this system.
Can I use 2 transformers on 1 rail?
No! This is very dangerous! If one transformer is plugged into the power socket and you touch the other plug, you will be exposed to 230 V!
How many light fixtures can be installed on one rail segment?
If you keep in mind the following rules, you can place as many fixtures as you like:
- 1 transformer per 52.5 ft (16 m) of rail
- a minimum of 1 and a maximum of 10 fixtures per transformer
- a maximum of 4 rail connectors or corner connectors per transformer
When in doubt, please contact us.
Can the cable be extended (from the rail to the transformer / from the transformer to the power socket)?
STAS urges you NOT to do this. The transformer cables are molded in the transformer and therefore cannot be extended or shortened. Shortening of the cable can cause the lamps to burn out.
Can I use the system in the bathroom?
No, the system is not suitable for use in damp or wet environments.
Should I turn off the power before I place the fixtures?
Yes. Install the entire system including the fixtures with lamps, then turn the power on. If you wish to rearrange the fixtures, turn the power off again.
Should I turn off the power before I replace the lamps?
Yes. For your own safety, always turn off the power before you rearrange the light fixtures or replace the lamps.
CAUTION! RISK OF ELECTRIC SHOCK!
SAFETY PRECAUTIONS:
Do not short-circuit the output terminals.
Ensure the correct voltage is used as continuous excess voltage could damage your multirail system.
DO NOT OPEN this unit. To reduce risk of shock, this product should ONLY be opened by an authorized technician when service is required.
Disconnect the product from mains and other equipment if a problem should occur.
Do not expose the product to water or moisture.